Amigurumi Bear Pattern: A Simple Seated Teddy for Beginners
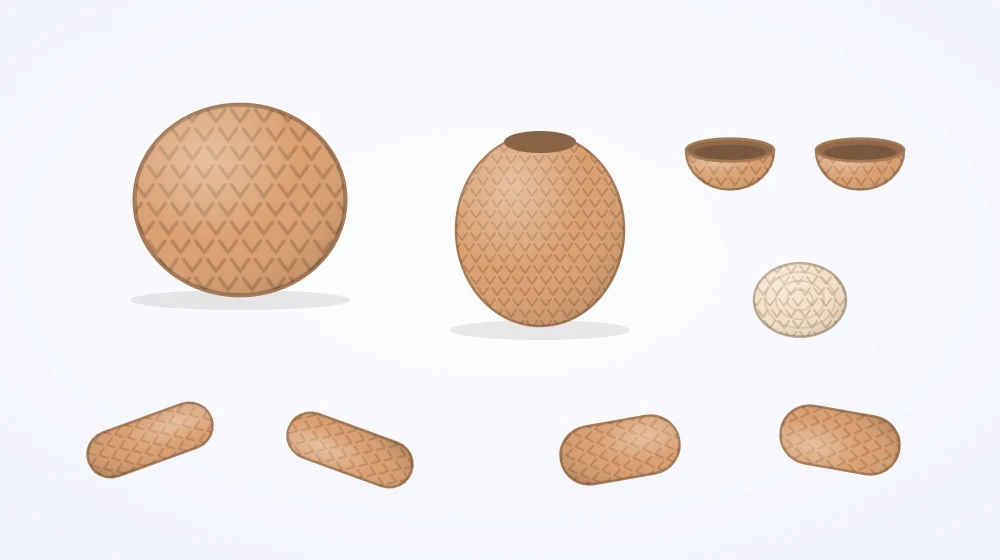
A simple seated teddy bear worked in nine small pieces: head, body, round ears, muzzle, arms and legs, with the assembly order and an embroidered face.

Tutorial at a glance
Materials
- Warm brown worsted weight yarn
- Small amount of cream or tan yarn for the muzzle
- Two 6 mm safety eyes or black yarn
- Dark yarn for the nose and mouth
- Polyester fiberfill
- Locking stitch marker
- Blunt yarn needle and pins
A seated teddy is the classic first animal because every part of it is a shape a beginner already knows: two balls, four tubes, two cups and one small disc. This amigurumi bear pattern keeps every piece at 30 stitches or fewer and is designed to sit about 4.5 in (11 cm) tall, depending on yarn and tension.
If round-by-round notation is still new, start with how to read amigurumi patterns, then come back with your hook.
Materials
- Worsted weight (#4 medium) cotton or acrylic yarn in warm brown
- A small amount of cream or tan yarn for the muzzle
- 3.5 mm (US E-4) hook
- Two 6 mm safety eyes, or black yarn to embroider them
- Dark brown or black yarn for the nose
- Polyester fiberfill, a locking stitch marker, a blunt yarn needle and pins
Watch out
Safety eyes are a choking hazard for babies and children under 3. For a young child, leave them out and embroider the eyes with yarn instead.
Abbreviations and method
- MR: magic ring
- st(s): stitch(es)
- sc: single crochet
- inc: increase, 2 sc in the same stitch
- dec: invisible decrease, sc 2 stitches together through the front loops
- Rnd: round
- FO: fasten off
Work every piece in a continuous spiral with the right side facing out, and move the stitch marker into the first stitch of each round. The number in parentheses is the stitch count at the end of the round. Each piece begins with a magic ring.
Head and body
In this amigurumi bear pattern the head is worked from the crown down and the body from the base up. Both stop at 18 stitches, so the two open edges match stitch for stitch when you sew them together.
Head (make 1, brown)
- Rnd 1: 6 sc in MR (6)
- Rnd 2: inc x 6 (12)
- Rnd 3: (sc 1, inc) x 6 (18)
- Rnd 4: (sc 2, inc) x 6 (24)
- Rnd 5: (sc 3, inc) x 6 (30)
- Rnds 6-11: sc 30 (30)
- Insert the safety eyes between Rnds 8 and 9, with 7 stitches between them, and press the washers on.
- Rnd 12: (sc 3, dec) x 6 (24)
- Rnd 13: (sc 2, dec) x 6 (18)
- Stuff firmly. FO, leaving a long tail for sewing.
Body (make 1, brown)
- Rnd 1: 6 sc in MR (6)
- Rnd 2: inc x 6 (12)
- Rnd 3: (sc 1, inc) x 6 (18)
- Rnd 4: (sc 2, inc) x 6 (24)
- Rnd 5: (sc 3, inc) x 6 (30)
- Rnds 6-8: sc 30 (30)
- Rnd 9: (sc 3, dec) x 6 (24)
- Rnds 10-11: sc 24 (24)
- Rnd 12: (sc 2, dec) x 6 (18)
- Rnd 13: sc 18 (18)
- Stuff firmly, packing the wide base well so the bear sits. FO and weave in the tail.
Ears, muzzle, arms and legs
Ears (make 2, brown)
- Rnd 1: 6 sc in MR (6)
- Rnd 2: inc x 6 (12)
- Rnds 3-4: sc 12 (12)
- Do not stuff. FO with a long tail and press the cup flat.
Muzzle (make 1, cream)
- Rnd 1: 6 sc in MR (6)
- Rnd 2: inc x 6 (12)
- Rnd 3: sc 12 (12)
- FO with a long tail.
Arms (make 2, brown)
- Rnd 1: 6 sc in MR (6)
- Rnd 2: (sc 1, inc) x 3 (9)
- Rnds 3-9: sc 9 (9)
- Stuff the lower half only. Pinch the top flat and FO with a long tail.
Legs (make 2, brown)
- Rnd 1: 6 sc in MR (6)
- Rnd 2: inc x 6 (12)
- Rnds 3-4: sc 12 (12)
- Rnd 5: (sc 2, dec) x 3 (9)
- Rnds 6-8: sc 9 (9)
- Stuff the foot firmly and the top lightly. FO with a long tail.
Assembly order
Pin every piece in place before the needle comes out. The stitches themselves are explained in the guide to sewing amigurumi pieces together; the order below keeps the easy-to-reach jobs first.
- Muzzle. Center it between the eyes over Rnds 8-11 of the head, so the eyes sit at its upper corners. Whip stitch around the edge and push in a pinch of stuffing before closing the last few stitches.
- Nose and mouth. Embroider them now, while the head is still easy to hold.
- Ears. Pin one on each side of the crown, across Rnds 4-8, curved slightly forward. Check from the front and from above, then sew through both layers of the flattened edge.
- Head to body. Match the two 18-stitch openings and sew stitch to stitch. Add a little more stuffing into the neck just before you close the seam.
- Legs. Sew the open ends to the front of the body around Rnds 3-5, pointing forward.
- Arms. Sew the flattened tops to the sides of the body one round below the neck.
The face
With dark yarn, work four or five horizontal straight stitches across the top of the muzzle, each about two stitches wide, to build a small oval nose. From the bottom of the nose, take one short vertical stitch down, then a small slanted stitch to each side for the mouth.
For embroidered eyes, wrap two short vertical stitches over the same spot between Rnds 8 and 9. Placement changes the expression more than any other detail, and amigurumi face embroidery covers the options.
Tip
Push the eye posts through the fabric and study the face before fitting the washers. Once a washer is on, it is not meant to come off again.
When the bear looks wrong
- The head flops. The neck is under-stuffed or the seam is loose. Add fiberfill through the gap and work a second pass of stitches around the join.
- The bear tips backward. Move the legs slightly wider apart and make sure the body base is packed firmly.
- The ears do not match. Count the rounds on each. One extra round is enough to show.
- Stuffing shows between stitches. The fabric is too loose for the yarn, so drop down a hook size and crochet more tightly.
The same head takes very different ears, and amigurumi ears shows how to turn this bear into another animal.
Frequently asked questions
Can the bear be made bigger without rewriting the pattern?
Yes. Use a thicker yarn with a hook sized to keep the fabric dense, and follow the same rounds. Every piece grows together, so the proportions stay the same. Choose larger safety eyes to match.
Should the muzzle be sewn on before or after stuffing the head?
After. A stuffed head gives a firm, rounded surface to pin against, so the muzzle keeps its position while you sew. The safety eyes are the only face detail that has to go in before the head is stuffed.
Why are the ears left unstuffed?
A flattened double layer of fabric is already stiff enough to stand up at this size. Stuffing would turn the ears into balls and make them heavy enough to pull on the seam.