How to Crochet a Magic Ring for Amigurumi, Step by Step
The magic ring explained one movement at a time for right- and left-handers, with how to lock the tail, the chain-2 alternative and fixes for a ring that will not close.

Tutorial at a glance
Materials
- Smooth worsted weight yarn in a light color
- 3.5 mm (US E-4) crochet hook
- Locking stitch marker
- Blunt yarn (tapestry) needle
- Scissors
A magic ring is an adjustable loop of yarn that you crochet your first stitches into and then pull shut, so the center of the piece closes completely. It is also called a magic circle or adjustable ring, and almost every amigurumi pattern begins with one. Learning how to crochet a magic ring takes a few awkward attempts, because nothing holds the loop in shape until the stitches are sitting on it.
What you need and the abbreviations
Practice with a smooth worsted weight (#4 medium) yarn in a light color and a 3.5 mm (US E-4) hook. Fuzzy yarn, or yarn that splits easily, makes the ring harder to pull closed; the guide to the best yarn for amigurumi explains what to choose.
- MR: magic ring
- ch: chain
- sc: single crochet
- inc: increase (2 sc in the same stitch)
- st(s): stitch(es)
- Rnd: round
These are US terms; the shorthand is explained in how to read amigurumi patterns.
The magic ring step by step (right-handed)
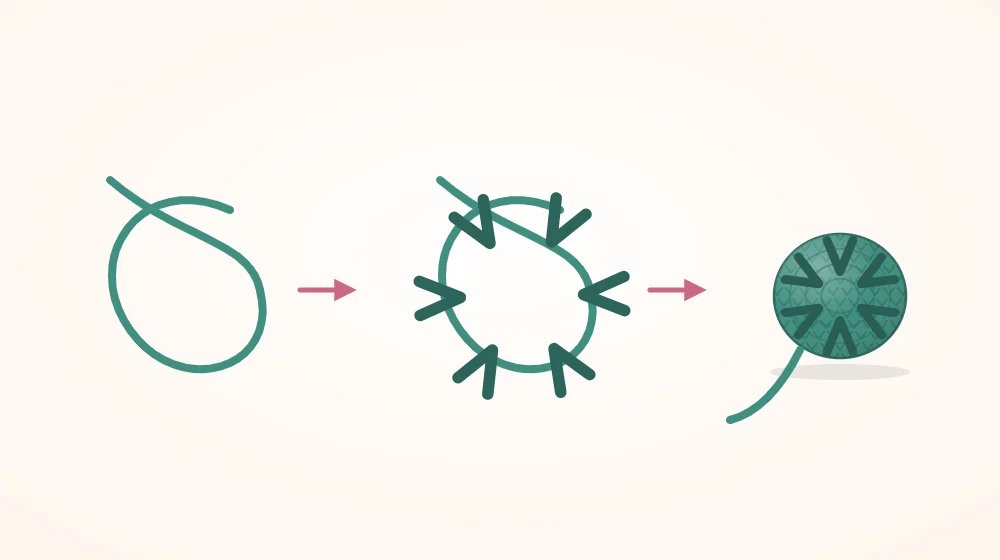
- Make the loop. Leave a tail about 4 in (10 cm) long. Cross the working yarn (the strand that leads to the ball) over the tail to form a loop roughly 1 in (2.5 cm) across. Pinch the crossing point between the thumb and middle finger of your left hand, and run the working yarn over your left index finger to keep it taut.
- Pull up a loop. Insert the hook into the ring from front to back, catch the working yarn and draw it through to the front. There is one loop on the hook.
- Anchor it with a chain. Yarn over (wrap the working yarn over the hook) and pull it through the loop on the hook. This ch 1 only fastens the yarn to the ring. It does not count as a stitch.
- Work the first single crochet. Insert the hook into the ring again, passing under both the ring strand and the tail that lies beside it. Yarn over and pull up a loop, so there are two loops on the hook. Yarn over again and pull through both loops. That is one sc.
- Add five more. Repeat step 4 until there are 6 sc on the ring. Slide the finished stitches along the ring toward your thumb as you go to make room.
- Close the ring. Hold the stitches between thumb and finger and pull the tail firmly. The loop slides through the stitches and they gather into a tight circle with no hole in the middle.
- Start the next round. Work the next stitch into the first sc you made, not into the ch 1, and clip a locking stitch marker into that new stitch so you can find the start of the round.
The same ring for left-handers
Every step is identical with the hands swapped. Hold the hook in your left hand, pinch the crossing point with your right thumb and middle finger, and tension the working yarn over your right index finger. The stitches travel clockwise around the ring instead of counterclockwise, so a left-handed ring is a mirror image of the drawings above.
Practice start
Repetition is the quickest way to learn how to crochet a magic ring. Work this short start, pull it out and begin again until closing the ring feels routine.
Flat practice circle (make as many as you like)
- Rnd 1: 6 sc in MR (6)
- Pull the tail to close the ring. Place the stitch marker in the first stitch of the next round.
- Rnd 2: inc x 6 (12)
Those two rounds are the opening of nearly every round piece. Keep increasing and they become the first real project, an amigurumi ball.
Securing the tail so the ring stays shut
Pulling the tail closes the ring, but only friction holds it there. Lock it before the piece is stuffed and closed.
- After Rnd 2, pull the tail once more.
- Thread the tail onto a blunt yarn (tapestry) needle. On the wrong side, run the needle under the bases of the Rnd 1 stitches, all the way around the circle, in the direction that keeps the ring tight.
- Turn back and pass the needle through two or three of the same stitches in the opposite direction. The change of direction is what stops the tail from sliding out.
- Trim the tail, leaving a short end inside the piece.
Watch out
Do not count on the stuffing to hold the ring closed. A tail that is trimmed short without being woven in can work loose as the toy is handled, and the hole reopens where it is hardest to reach.
The chain-2 alternative
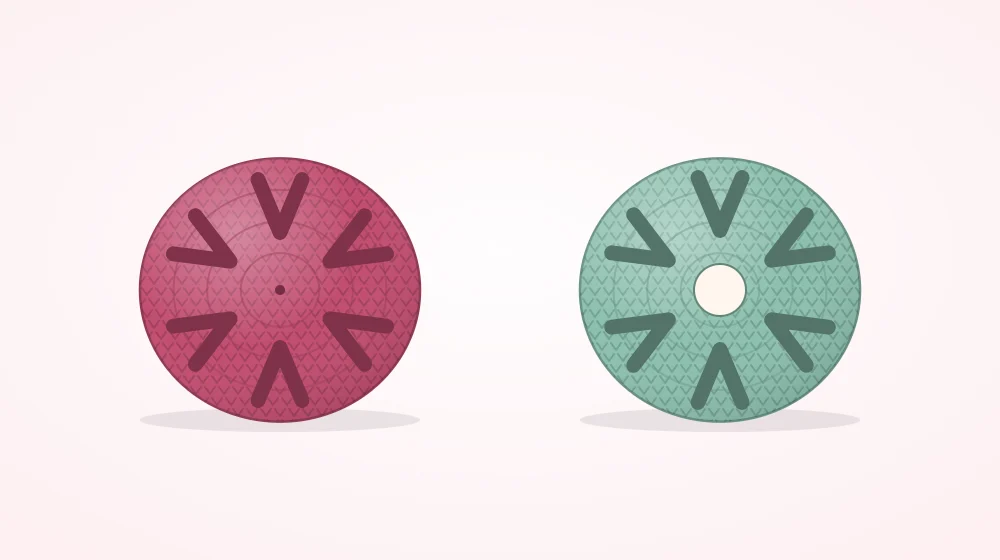
If the ring keeps defeating you, begin with a short chain instead. The result is close enough for practice pieces.
Chain-2 practice circle (make 1)
- Rnd 1: ch 2, then work 6 sc into the second ch from the hook (6)
- Rnd 2: inc x 6 (12)
All six stitches crowd into one chain, which stretches and leaves a small hole at the center that cannot be drawn fully shut. To reduce it, keep the first chain snug and tie the starting slip knot so that it tightens when you pull the tail, not the working yarn. A tug on the tail afterward then shrinks the center a little.
Troubleshooting
The ring will not close
- Wrong strand. Pulling the working yarn does nothing useful. Only the tail closes the ring.
- Split yarn. If the hook passed through the plies of the ring strand during a stitch, that stitch pins the loop in place. Pull the stitches out and work them again, going cleanly under the strand.
- A knot at the start. A slip knot tied onto the hook before making the loop fixes the loop at one size. Start from a plain crossed loop.
- Grippy yarn. Fuzzy and plush yarns cling to themselves. Pull in short tugs while easing the stitches around the ring, or use the chain-2 start.
The ring loosens later
This nearly always means the tail was never locked. If the piece is still open, weave the tail as described above. If the toy is already closed, thread matching yarn through the bases of the Rnd 1 stitches from the outside, draw them together, knot the ends and bury them inside. Other early slips are collected in the list of common amigurumi mistakes.
Frequently asked questions
Is a magic ring the same as a magic circle?
Yes. Magic ring, magic circle, magic loop and adjustable ring are all names for the same start: stitches worked around a loop of yarn that is then pulled closed. Patterns use whichever name the writer prefers, and the technique does not change.
How many stitches go into a magic ring?
Most amigurumi patterns start with 6 single crochet, because six evenly spaced increases per round keep a circle flat. Some patterns start with 5, 7 or 8 for a particular shape. Follow the number in the first round of the pattern you are using.
Does the chain at the start of a magic ring count as a stitch?
No. The chain 1 made after pulling up the first loop only anchors the yarn to the ring. Do not work into it on the next round. The first stitch of round 2 goes into the first single crochet.