Amigurumi Color Change: Clean Stripes in Spiral Rounds
How to change yarn color on the last yarn over, soften the jog that spiral rounds leave in stripes, choose between carrying and cutting, and secure the tails inside the toy.

Tutorial at a glance
Materials
- Worsted weight yarn in two colors
- 3.5 mm (US E-4) crochet hook
- Locking stitch marker
- Polyester fiberfill
- Blunt yarn (tapestry) needle
- Scissors
A striped scarf on a bear, a white belly on a whale, a shirt above a doll’s trousers: each depends on the same small move, made one stitch earlier than most beginners expect. A clean amigurumi color change happens on the last yarn over of the stitch before the new color begins. The rest is housekeeping: softening the step that spiral rounds create, carrying or cutting the yarn, and anchoring the tails.
Abbreviations
- MR: magic ring
- sc: single crochet
- inc: increase (2 sc in the same stitch)
- dec: invisible decrease (sc 2 stitches together through the front loops)
- sl st: slip stitch
- BLO: back loop only
- st(s): stitch(es)
- Rnd: round
- FO: fasten off
The basic change: switch on the last yarn over
When you finish a single crochet, the loop left on the hook does not belong to that stitch. It becomes the top of the next one. So if the next stitch is to be entirely in the new color, the loop that completes the current stitch must already be in the new color.
- Begin the last stitch of the old color as usual: insert the hook, yarn over (wrap the yarn over the hook) and pull up a loop. Two loops of the old color are on the hook.
- Drop the old yarn to the inside of the piece.
- Lay the new yarn over the hook, leaving a tail of about 4 in (10 cm), and pull it through both loops. The stitch is finished in the old color and the loop on the hook is the new color.
- Work the next sc with the new yarn.
The rule holds for every stitch. On an increase, change on the final yarn over of its second sc; on a dec, on the yarn over that closes it.
Why stripes jog, and how to reduce it
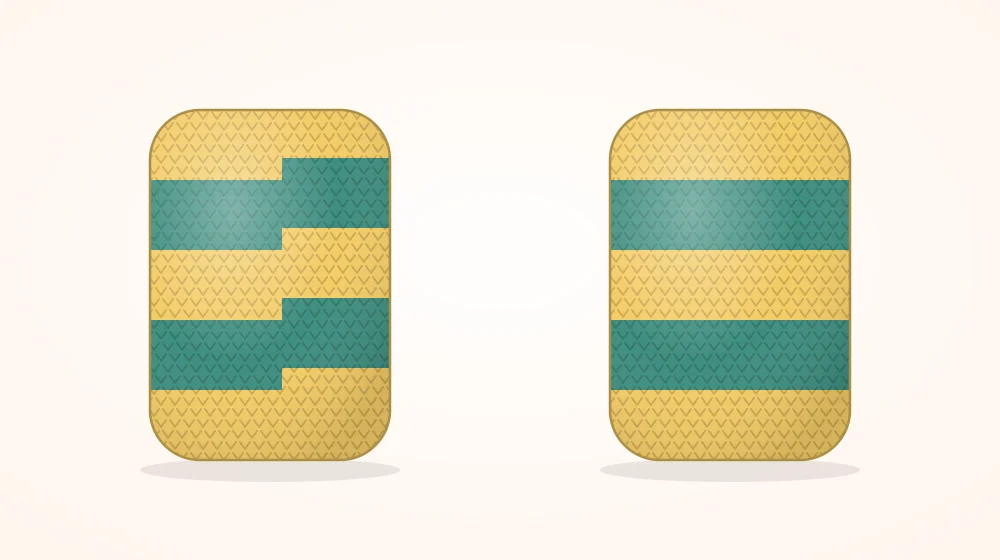
Amigurumi is worked in a continuous spiral, so a round never returns to its own level. Its last stitch sits one stitch higher than its first. In one color that is unnoticeable. In stripes it shows as a small stair step, called a jog, at the point where each new color starts.
Slip stitch the first stitch
Change color as described, then work the first stitch of the new round as a loose sl st instead of an sc. Work the rest of the round in sc. On the following round, work an sc into that sl st like any other stitch, so the count does not change. A slip stitch is shorter than a single crochet, which lowers the start of the new color.
Back loop on the first stitch
Alternatively, work the first sc of the new color through the back loop only. The stitch tilts slightly, and the unused front loop of the old color stays on the surface and blurs the step.
Neither method erases the jog completely. They reduce it, and placement does the rest: plan the piece so the start of the round runs up the back or underside of the toy.
Carrying or cutting the yarn
| Situation | What to do with the idle yarn | What to watch |
|---|---|---|
| Narrow repeating stripes, one or two rounds each | Carry it up the inside from stripe to stripe | Leave slack in the carried strand; a tight one puckers the fabric |
| Wide stripes, or a single change such as a body into a head | Cut it, leaving a tail of about 4 in (10 cm) | Secure both tails before the opening gets small |
| A patch inside a round, such as a belly or an eye patch | Carry it across the back of the patch, or crochet over it as you go | Long loose strands catch on stuffing tools; a dark strand under light stitches can show through |
Securing the tails inside
The inside of a stuffed toy is never seen, which allows a shortcut: tie the old tail and the new tail together in a square knot, snug against the fabric but not so tight that the stitches at the change are distorted. Leave the ends a little long and let the stuffing bury them. On unstuffed or flat pieces, such as wings or ears, weave the ends through the backs of stitches of their own color with a blunt yarn (tapestry) needle.
Watch out
Knot or weave the tails while you can still reach them. Once the decrease rounds narrow the opening, an unsecured change is hard to get at and can open into a hole when the piece is stuffed.
Planning stripes and patches
- Change on even rounds when you can. A stripe that starts on plain sc is easier to keep level.
- Expect patches to lean. Stitches in a spiral sit slightly to one side of the stitches below them, so a patch planned as a straight block drifts sideways. Shift its starting stitch by one every few rounds, or crochet the patch separately and sew it on.
Stripes are put to work in the mini amigurumi bee, a contrasting belly in the mini amigurumi whale, and clothing made by color change alone in the beginner amigurumi doll.
Practice piece: a striped ball
Every amigurumi color change in this small ball falls on a plain round, where the jog is easiest to see. Use two colors of worsted weight (#4 medium) yarn, A and B, with a 3.5 mm (US E-4) hook and a stitch marker in the first stitch of each round. Try the plain change at the first stripe, the slip stitch start at the second and the back loop start at the third.
Striped ball (make 1)
- Start with color A.
- Rnd 1: 6 sc in MR (6)
- Rnd 2: inc x 6 (12)
- Rnd 3: (sc 1, inc) x 6 (18)
- Rnd 4: (sc 2, inc) x 6 (24)
- Change to B on the last yarn over of Rnd 4. Carry A up the inside.
- Rnds 5-6: sc 24 (24)
- Change to A on the last yarn over of Rnd 6. Carry B up the inside.
- Rnds 7-8: sc 24 (24)
- Change to B on the last yarn over of Rnd 8. Cut A, leaving a tail, and knot it to the starting tail of B inside.
- Rnds 9-10: sc 24 (24)
- Rnd 11: (sc 2, dec) x 6 (18)
- Rnd 12: (sc 1, dec) x 6 (12)
- Check that every tail is secured, then stuff firmly.
- Rnd 13: dec x 6 (6)
- FO, leaving a tail. Thread it through the front loops of the last 6 sts and pull to close.
Frequently asked questions
Why does a stitch of the old color show up in my new stripe?
The change was made one step too late. If you finish a stitch completely in the old color, the loop on the hook is still the old color, and that loop becomes the top of the next stitch. Switch yarns on the final yarn over of the stitch before the new color starts.
Can I tie knots when changing colors in amigurumi?
Inside a stuffed piece, yes. A square knot joining the old and new tails sits against the wrong side and is buried by the stuffing. On flat or unstuffed pieces, where a knot could make a visible lump or work through to the front, weave the ends in instead.
How many rounds can I carry a yarn before I should cut it?
Carrying works well across one or two rounds, where the strand running up the inside stays short. Across wider stripes the strand becomes long enough to snag or to pull tight when the piece is stuffed, so cutting and securing the tails is the safer choice.