Basic Amigurumi Shapes: Disc, Dome, Egg, Cone, Tube and Oval
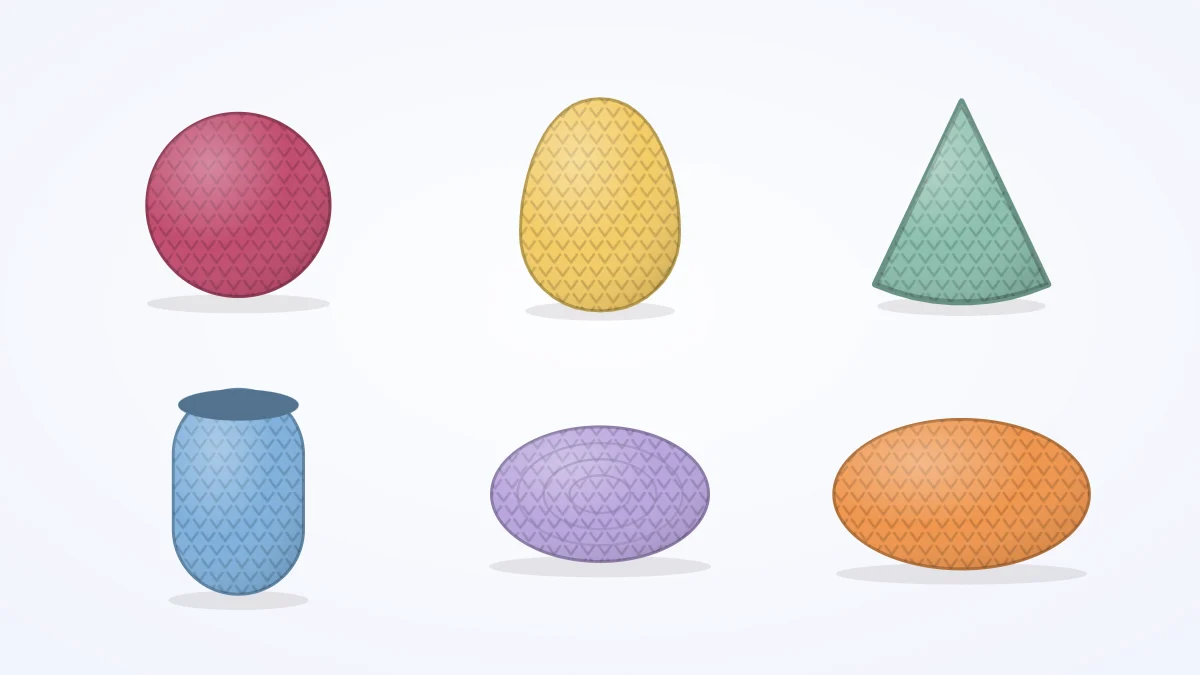
Six shapes beyond the ball, each with the increase rule that creates it, a short example pattern and the body parts it usually becomes.
Tutorial at a glance
Materials
- Worsted weight (#4 medium) yarn, scraps in any light colors
- 3.5 mm (US E-4) crochet hook
- Locking stitch marker
- Polyester fiberfill
- Blunt yarn (tapestry) needle
Take any crocheted animal apart in your head and the pieces turn out to be very ordinary: a ball, a couple of tubes, a cone, a disc. The basic amigurumi shapes below, together with the amigurumi ball, cover almost every body part a beginner pattern asks for. Each one comes down to a single question: where do the increases and decreases go, and how fast?
Abbreviations and setup
MR magic ring, ch chain, sc single crochet, inc increase (2 sc in the same stitch), dec invisible decrease (sc 2 stitches together through the front loops), sl st slip stitch, BLO back loop only, Rnd round, FO fasten off.
The examples assume worsted weight (#4 medium) yarn and a 3.5 mm (US E-4) hook. All are worked in a continuous spiral, right side out, with a stitch marker in the first stitch of each round.
Flat disc
What makes it: six increases in every round, spread evenly. At that rate a circle of single crochet lies flat. Stop whenever the disc is wide enough.
Disc (make 1)
- Rnd 1: 6 sc in MR (6)
- Rnd 2: inc x 6 (12)
- Rnd 3: (sc 1, inc) x 6 (18)
- Sl st in the next stitch and FO, leaving a tail for sewing.
Becomes: muzzles, eye patches, tummy patches, the soles of feet and the base of anything that has to sit flat.
Dome
What makes it: a disc followed by rounds with no increases. The edge stops spreading and turns upward into a cup. More even rounds make a deeper cup.
Dome (make 1)
- Rnd 1: 6 sc in MR (6)
- Rnd 2: inc x 6 (12)
- Rnd 3: (sc 1, inc) x 6 (18)
- Rnds 4-6: sc 18 (18)
- FO, leaving a tail. Stuff lightly when sewing the open edge onto another piece.
Becomes: snouts, bulging eyes, mushroom caps, shells, hats and round cup ears. The guide to amigurumi ears builds several ear types from this start.
Egg
What makes it: a ball with uneven ends. One end increases slowly, by three stitches a round, so it stays narrow; the other end closes quickly, by six a round, so it stays blunt.
Egg (make 1)
- Rnd 1: 6 sc in MR (6)
- Rnd 2: (sc 1, inc) x 3 (9)
- Rnd 3: (sc 2, inc) x 3 (12)
- Rnd 4: (sc 1, inc) x 6 (18)
- Rnds 5-8: sc 18 (18)
- Rnd 9: (sc 1, dec) x 6 (12)
- Stuff firmly.
- Rnd 10: dec x 6 (6)
- FO and close the hole by threading the tail through the front loops of the last 6 stitches.
Becomes: one-piece bodies for birds and penguins, pears and strawberries, and pear-shaped torsos when worked wide end down. See amigurumi heads and bodies for a full-size body.
Cone
What makes it: very slow, steady increases. Here three stitches are added every second round. Adding them more often gives a wide, squat cone; less often gives a long spike.
Cone (make 1)
- Rnd 1: 6 sc in MR (6)
- Rnd 2: sc 6 (6)
- Rnd 3: (sc 1, inc) x 3 (9)
- Rnd 4: sc 9 (9)
- Rnd 5: (sc 2, inc) x 3 (12)
- Rnd 6: sc 12 (12)
- Rnd 7: (sc 3, inc) x 3 (15)
- Rnd 8: sc 15 (15)
- FO, leaving a tail for sewing.
Becomes: horns, beaks, carrots, party hats and tails. Pressed flat without stuffing, a cone is a pointed ear.
Tube
What makes it: a small disc, then even rounds for as long as the tube needs to be. Working the first even round in the back loop only (BLO), the loop farthest from you, leaves a ridge that gives the tube a crisp, flat end. Skip that step for a rounded end.
Tube (make 1)
- Rnd 1: 6 sc in MR (6)
- Rnd 2: inc x 6 (12)
- Rnd 3: in BLO, sc 12 (12)
- Rnds 4-9: sc 12 (12)
- FO, leaving a tail for sewing.
Becomes: arms, legs, necks, tree trunks and tails. Limb widths, stuffing and closing are covered in amigurumi arms and legs.
Oval started from a chain
What makes it: a starting chain in place of the magic ring. Stitches run along one side of the chain, turn around the end, and come back along the other side. All the increases sit at the two ends, so the piece grows as an oval. A longer chain makes a longer, narrower oval.
Oval (make 1)
- Ch 7.
- Rnd 1: starting in the 2nd ch from the hook, sc 5, 3 sc in the last ch; turn the piece and work along the other side of the chain: sc 4, 2 sc in the last ch (the one that holds the first stitch) (14)
- Rnd 2: inc, sc 4, inc x 3, sc 4, inc x 2 (20)
- For a flat oval, sl st in the next stitch and FO. For an oval cup, continue with even rounds of sc 20.
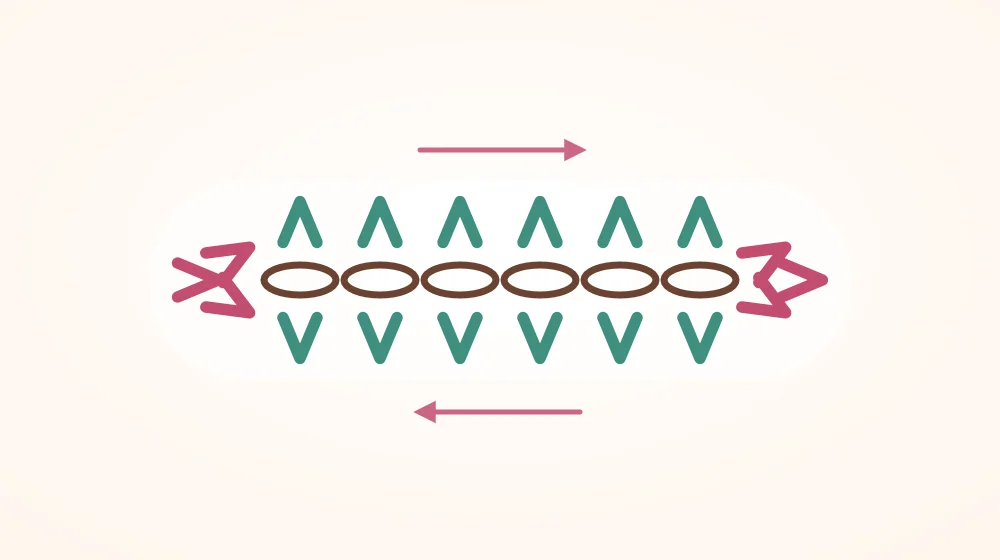
Becomes: long muzzles, feet and shoe soles, whale and fish bodies, and floppy ears.
Choosing a shape for a body part
| Shape | Increase rule | Typical parts |
|---|---|---|
| Flat disc | 6 per round, then stop | Muzzle, patch, base |
| Dome | 6 per round, then even rounds | Snout, cup ear, shell |
| Egg | Slow at one end, fast at the other | One-piece body, fruit |
| Cone | 3 every second round | Horn, beak, pointed ear |
| Tube | Small disc, then even rounds | Arm, leg, neck |
| Oval | Only at the two ends of a chain | Foot, long muzzle |
Tip
When a shape comes out wrong, look at the rate of change before anything else. A disc that ruffles has too many increases per round; one that cups has too few. Moving increases to one side of a piece is the next step, explained in amigurumi shaping.
Frequently asked questions
Why does my flat circle curl up at the edge?
A circle cups when a round has too few increases, or when the stitches are very tight. Check that each round added exactly six stitches. If the counts are right, a slightly looser tension on the outer rounds usually lets the disc lie flat.
Which shapes need stuffing and which do not?
Eggs, tubes that have to hold a pose and deep domes are stuffed. Flat discs and flat ovals are not, and cones or tubes meant to be pressed flat for ears and floppy limbs are left empty. Shallow domes get a small tuft just before they are sewn down.
Can I combine two shapes in one piece?
Yes, and many patterns do. A tube that widens into a dome makes a mushroom, and a cone that continues into even rounds makes a carrot or a tail. Change from one increase rule to the other at the round where the outline should change.