Mini Amigurumi Whale: A Palm-Sized Pattern
A palm-sized whale with a tapering body, a two-lobed tail fluke and side fins, plus an optional white belly worked with a simple color change.

Tutorial at a glance
Materials
- Blue sport weight cotton yarn
- White yarn for the optional belly
- Black embroidery thread or two 4 mm safety eyes
- Polyester fiberfill
- Locking stitch marker
- Fine blunt yarn needle
Start a ball, then simply take longer to close it. That slow finish is what gives a whale its shape: a round head that narrows in three stages to a slim tail. This mini amigurumi whale is built from that one tapering body plus four tiny flat pieces, two side fins and two lobes that join into the tail fluke. A white belly is optional and uses a basic color change over five plain rounds.
Materials and Size
- Sport weight (#2 fine) cotton yarn in blue, plus white if you want the belly
- 2.5 mm crochet hook
- Black embroidery thread for the eyes and smile, or two 4 mm safety eyes
- Polyester fiberfill
- Locking stitch marker and a fine blunt yarn needle
With these materials the whale is about 3 in (7.5 cm) long including the tail, small enough to sit in a palm, depending on yarn and tension. Worsted weight yarn and a 3.5 mm hook give a larger whale from the same rounds.
Watch out
Safety eyes are a choking hazard for babies and children under 3. Embroidered eyes are the safe choice, and they also suit a toy this small better.
Abbreviations
- MR: magic ring
- st(s): stitch(es)
- sc: single crochet
- inc: increase (2 sc in the same stitch)
- dec: invisible decrease (sc 2 stitches together through the front loops)
- Rnd: round
- FO: fasten off
All pieces are worked in a continuous spiral, right side out, with a stitch marker in the first stitch of each round.
Whale Body
The body begins at the nose and ends at the tail. It opens like a ball, but the closing half is stretched out with even rounds between the decrease rounds; the guide to basic amigurumi shapes explains why that produces a taper.
Body (make 1)
- Rnd 1: 6 sc in MR (6)
- Rnd 2: inc x 6 (12)
- Rnd 3: (sc 1, inc) x 6 (18)
- Rnd 4: (sc 2, inc) x 6 (24)
- Rnds 5-9: sc 24 (24)
- Rnd 10: (sc 2, dec) x 6 (18)
- Rnds 11-12: sc 18 (18)
- Add safety eyes now if you are using them (see the face section), then stuff the head firmly.
- Rnd 13: (sc 1, dec) x 6 (12)
- Rnds 14-15: sc 12 (12)
- Rnd 16: (sc 2, dec) x 3 (9)
- Rnd 17: sc 9 (9)
- Push small tufts of stuffing into the tail with the blunt end of the hook.
- Rnd 18: (sc 1, dec) x 3 (6)
- FO, thread the tail through the front loops of the last 6 stitches and pull the hole closed.
Optional white belly
On Rnds 5-9 only, work the first 8 stitches of each round in white and the remaining 16 in blue. In pattern terms each of those rounds becomes: white sc 8, blue sc 16. Switch by finishing the last stitch of one color with a yarn over in the other. Let the resting strand run loosely across the inside rather than cutting it; a strand pulled tight puckers the belly.
The white patch leans a little to one side as it grows, because spiral rounds shift by a fraction of a stitch each time. It sits underneath, so the lean stays out of sight. The full method, including how to secure the tails, is in the guide to amigurumi color changes.
Tail and Fins
Tail lobes (make 2)
- Rnd 1: 6 sc in MR (6)
- Rnd 2: (sc 1, inc) x 3 (9)
- Rnds 3-4: sc 9 (9)
- Rnd 5: (sc 1, dec) x 3 (6)
- Do not stuff. Press flat, FO and leave a long tail.
Side fins (make 2)
- Rnd 1: 6 sc in MR (6)
- Rnd 2: (sc 2, inc) x 2 (8)
- Rnds 3-4: sc 8 (8)
- Do not stuff. Press flat, FO and leave a long tail.
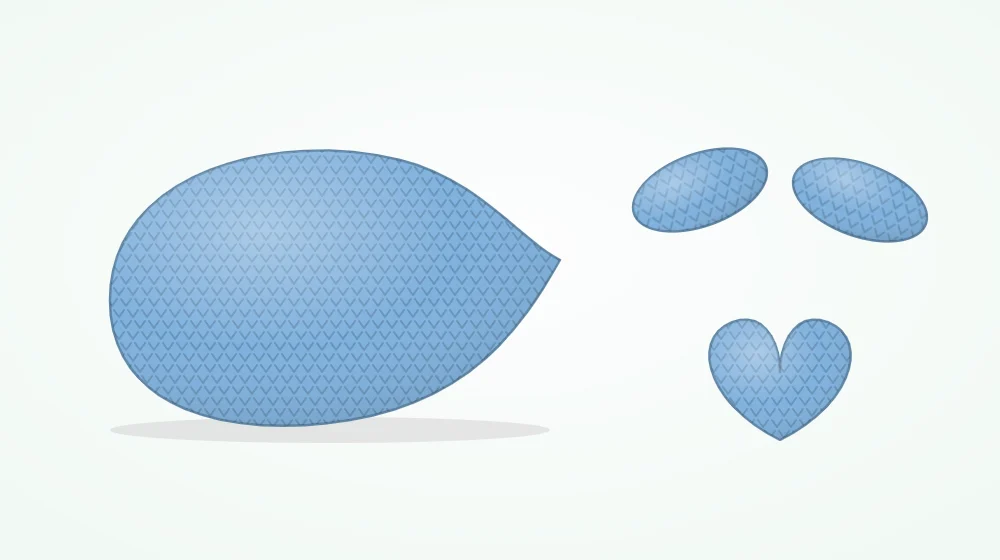
Assembly
- Find the belly. If you worked the white patch, it marks the underside. On a single-color whale, put the start of the rounds (the line your marker traveled along) underneath.
- Build the fluke. Hold the two lobes side by side with their open ends touching and sew those ends together for two or three stitches, so the lobes spread into a V.
- Attach the fluke. Sew the joined point of the V to the closed tip of the body, lobes lying horizontally like a real whale’s tail, not upright like a fish’s. A few extra stitches on the top side tilt the fluke upward.
- Attach the fins. Pin one fin on each side at Rnds 8-9, low on the body, just above where the belly would be. Sew only the open edge so the fin sticks out.
- Bury the ends. Pass each tail through the body and trim it close.
Pin both fins and look at the whale from the front before stitching; the general method is covered in the guide to sewing amigurumi pieces together.
Eyes and a Tiny Smile
Place the eyes between Rnds 6 and 7, one on each side of the head rather than both on the front, about 9 stitches apart measured across the top. Low, wide-set eyes give a mini amigurumi whale its gentle look. For embroidered eyes, wrap black thread two or three times over one stitch.
The smile is one short straight stitch on each side, starting a round below the eye and slanting up toward the nose, two stitches long. Start and end the thread on the belly and tug the knot inside.
Fixing Common Problems
- The tail is floppy. The narrow rounds were understuffed. Stuffing has to go in before Rnd 18, in pieces smaller than a pea; see how to stuff amigurumi for the technique.
- The whale rolls onto its side. One fin is sitting lower than the other and acting as a foot. Unpick it and move it up one round.
- The body looks like a teardrop, not a whale. The head needs more stuffing. Fill it until the first nine rounds form a firm half ball.
- Blue shows through the white belly. The carried blue strand is caught in a white stitch. Keep the resting strand behind the work, not under the stitch.
Tip
For a spout, knot three short strands of white yarn at the top of the head at Rnd 4 and trim them to different lengths. Once this one is done, the striped mini bee uses the same yarn and hook.
Frequently asked questions
Can I make the whale without the white belly?
Yes. The belly is optional and changes nothing in the stitch counts. Work every round in a single color and the whale is a plain one-yarn project with no carried strands to manage.
Which way should a whale's tail point?
A whale's fluke lies flat, side to side, unlike a fish tail that stands upright. Sew the two lobes so they spread left and right when the whale sits on its belly, then tilt them upward slightly with a few extra stitches on the top.
How do I turn this whale into a narwhal?
Add a horn. Work 4 sc in a magic ring with white yarn and continue in a spiral for five or six rounds without increasing, then sew the open end to the front of the head above the eyes. Treat it as an experiment and adjust the length by eye.